What is it?
Windows Autopilot offers a seamless and simplified experience for deploying new Windows devices. With this solution, you can pre-configure your devices, eliminating the need for manual interventions during installation. Your employees will benefit from an "out-of-the-box" experience where they only need to sign in with their Microsoft business credentials for their device to be automatically configured with company applications, settings, and security policies, as configured on the Factorial IT Cockpit.
Autopilot significantly reduces the time and effort needed to deploy and manage devices at scale, while ensuring immediate productivity for users.
What are the prerequisites?
- Have a Microsoft account with administrator access
- Have an Entra "tenant"
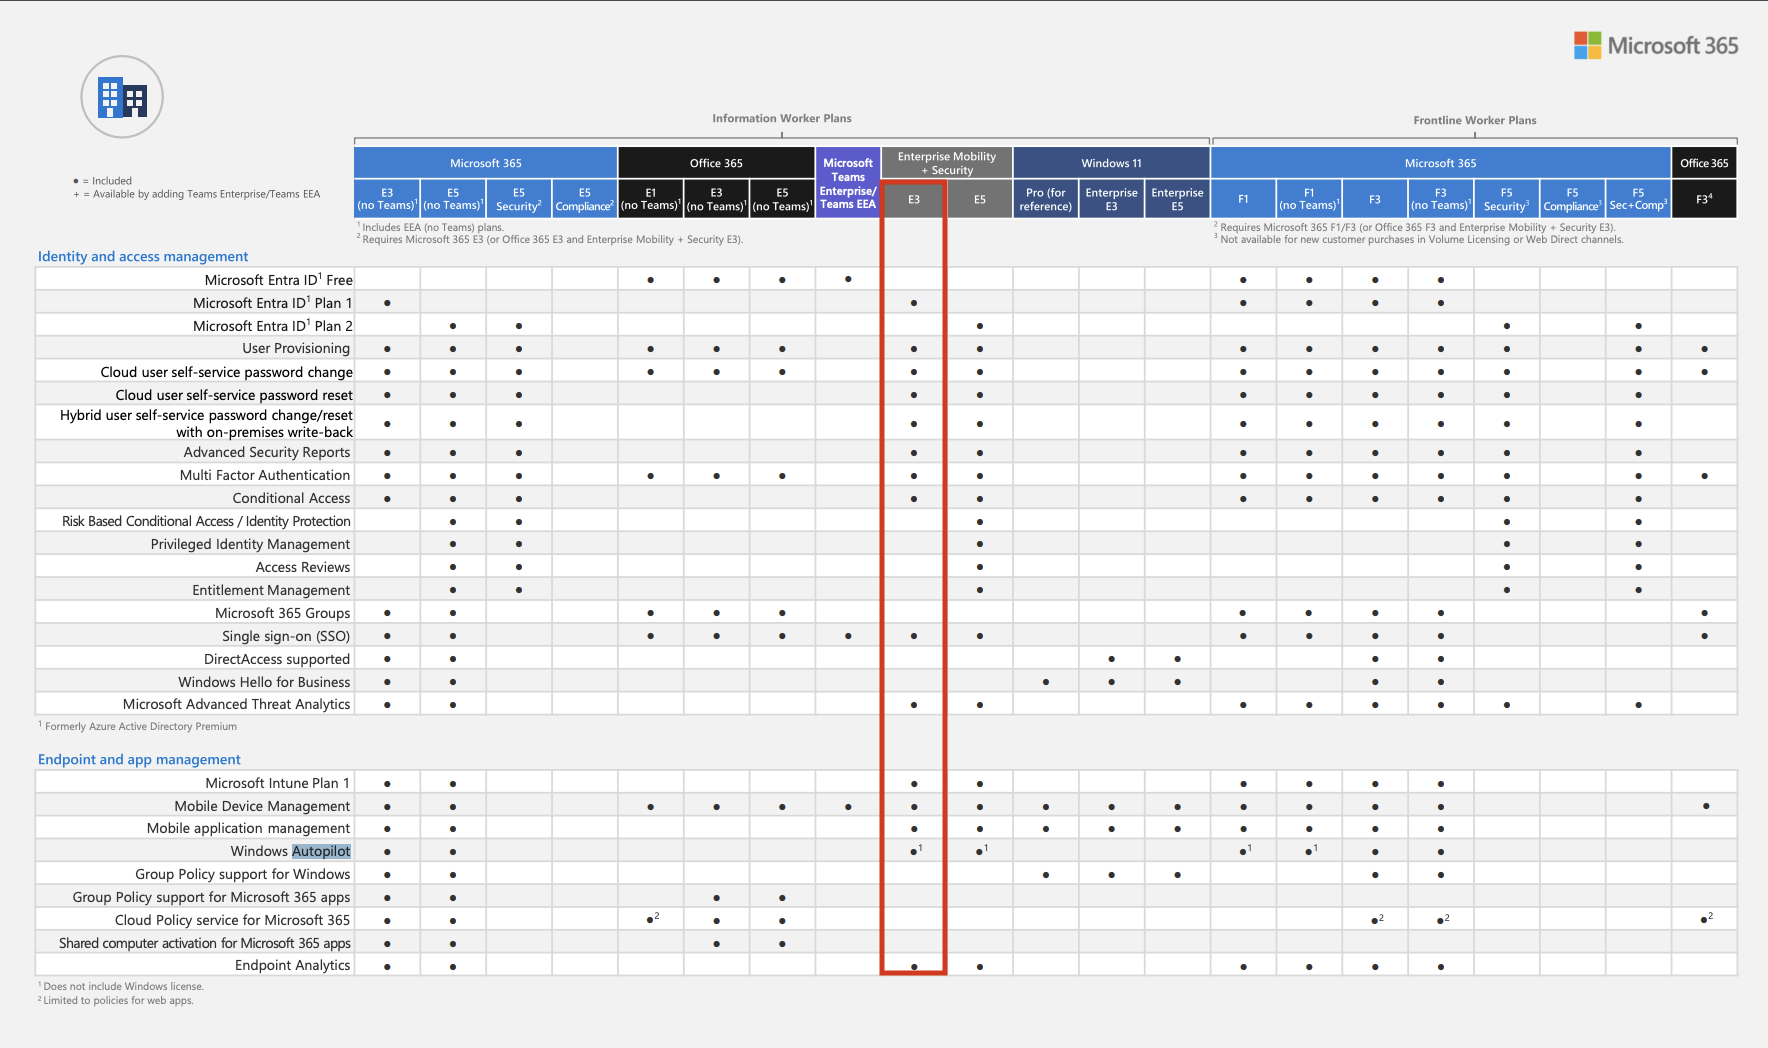
Have a license that includes:
Microsoft Entra ID Plan 1 (or Plan 2) & Windows Autopilot to manage the Entra console.
The minimum license that includes these 2 features is the Enterprise Mobility + Security E3 license (https://www.microsoft.com/fr-fr/microsoft-365/enterprise-mobility-security/compare-plans-and-pricing).
If you already have a Windows license for the person who will be managing the accounts, check if it already includes the necessary features for Autopilot using the following source, and if not, obtain an Enterprise Mobility + Security E3 license.
What happens when an employee arrives with a workstation configured with Autopilot?
- Power on the device
- Select country and language, configure keyboard language
- Connect to Internet (WIFI password if necessary)
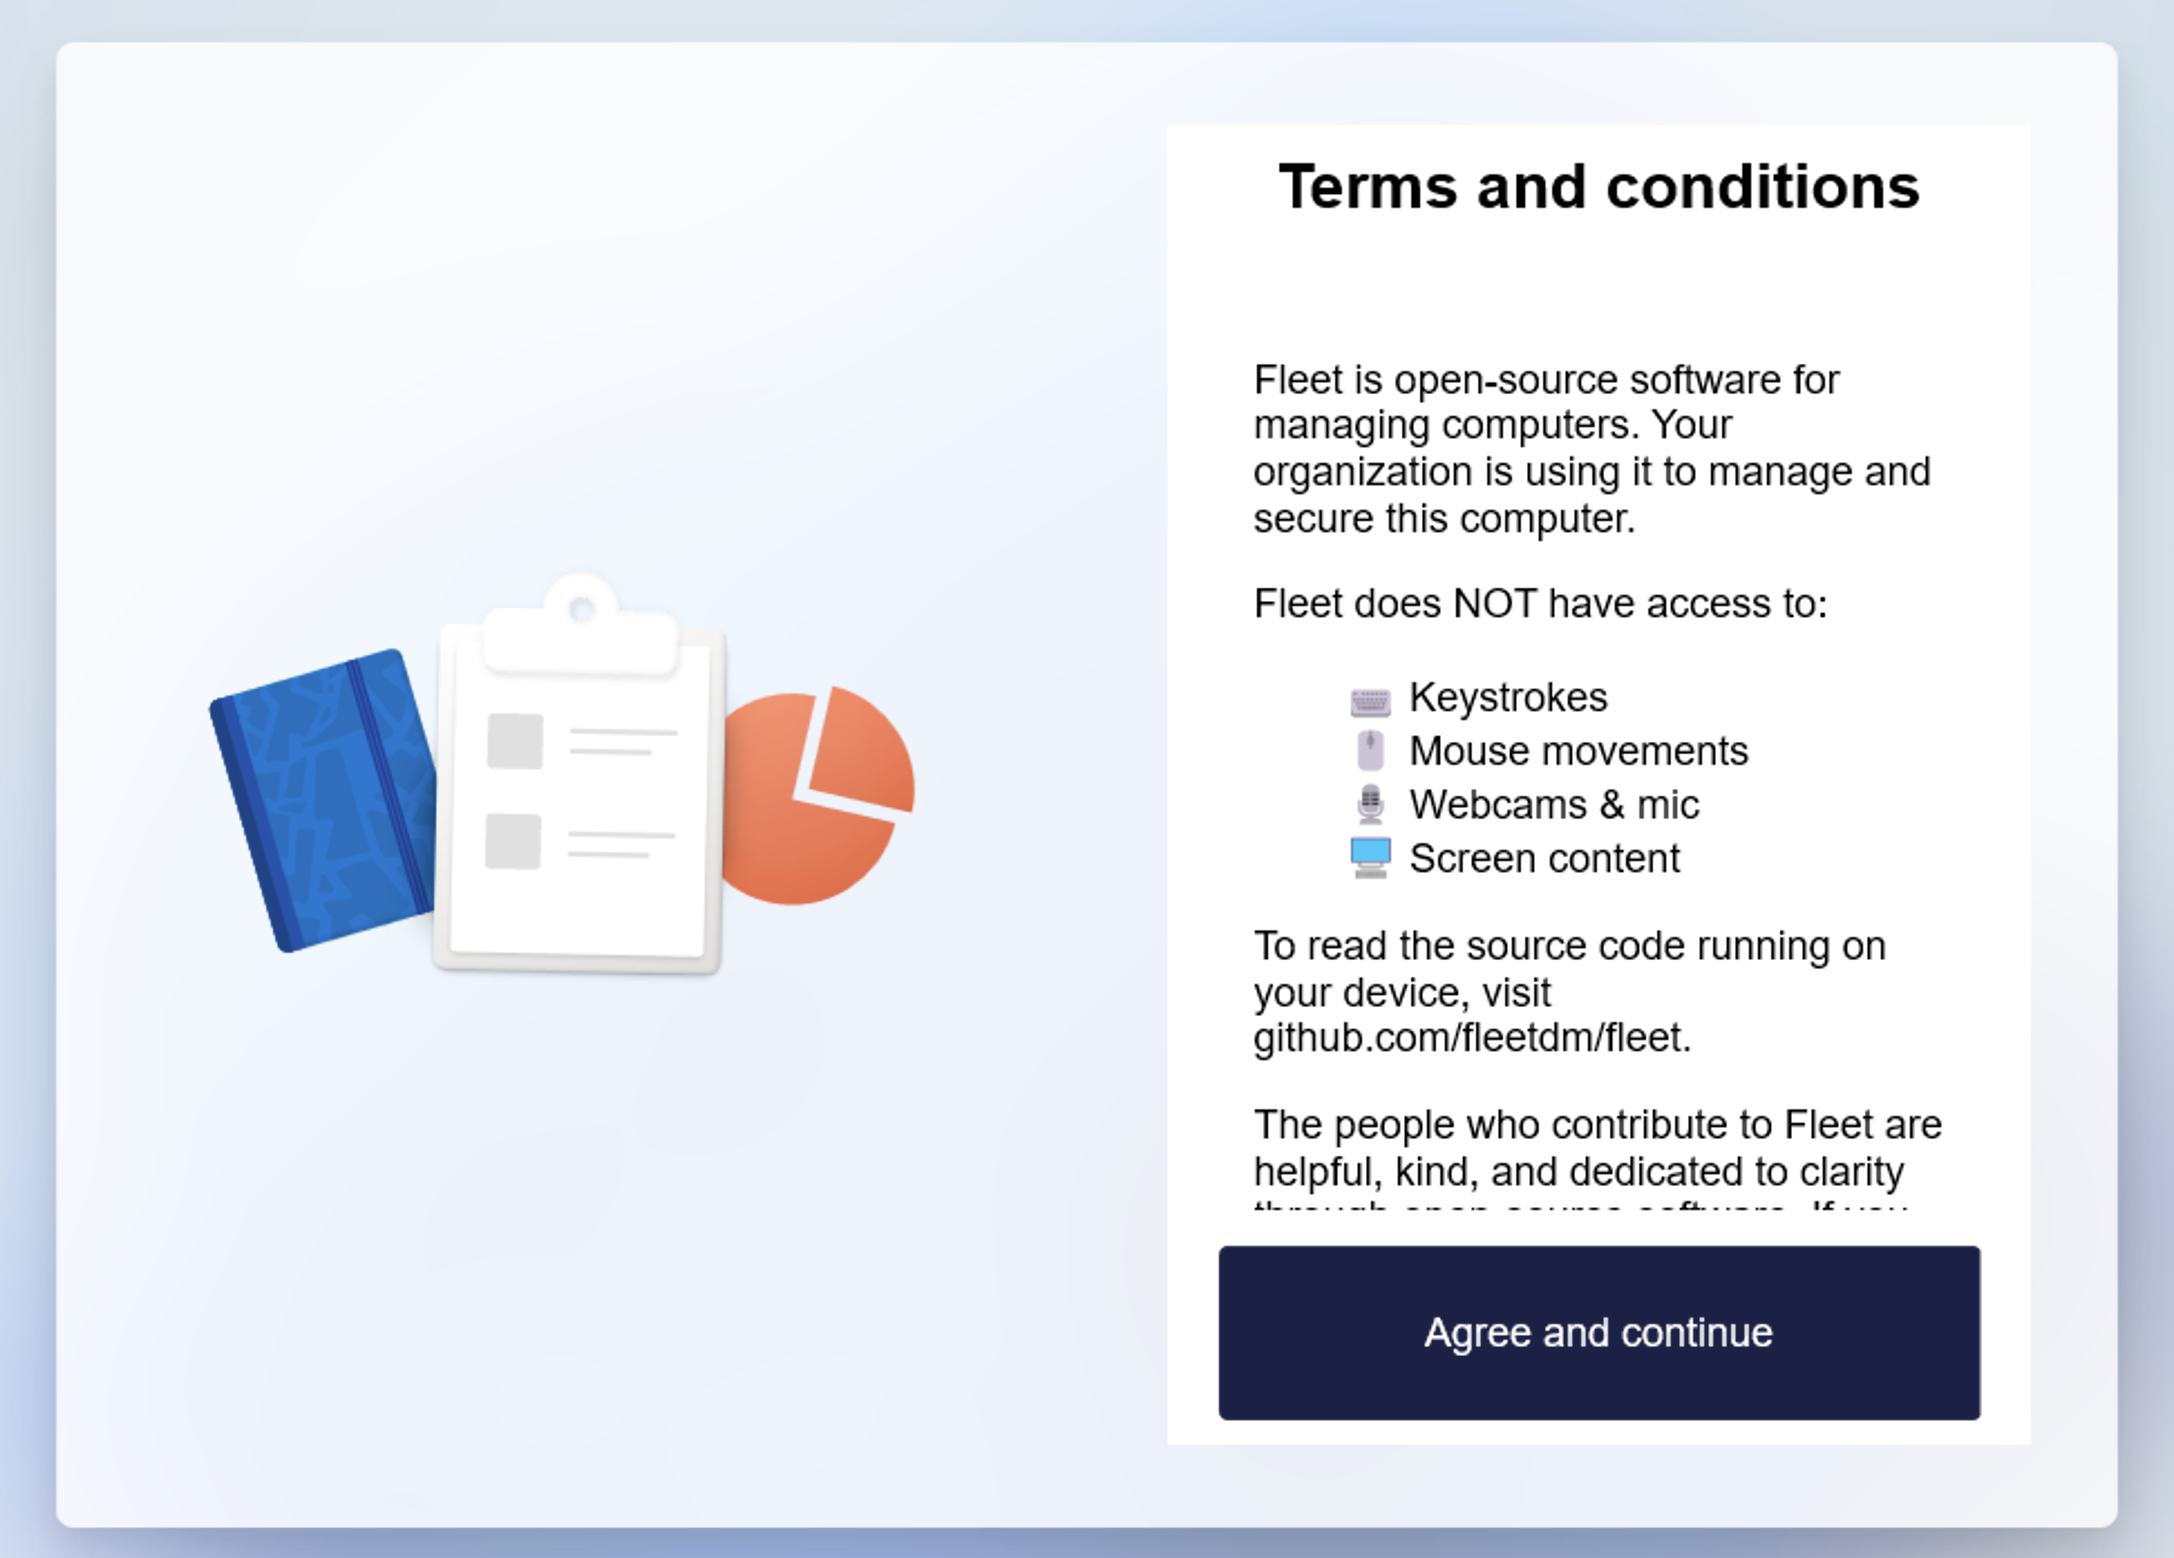
- Accept FleetDM terms and conditions
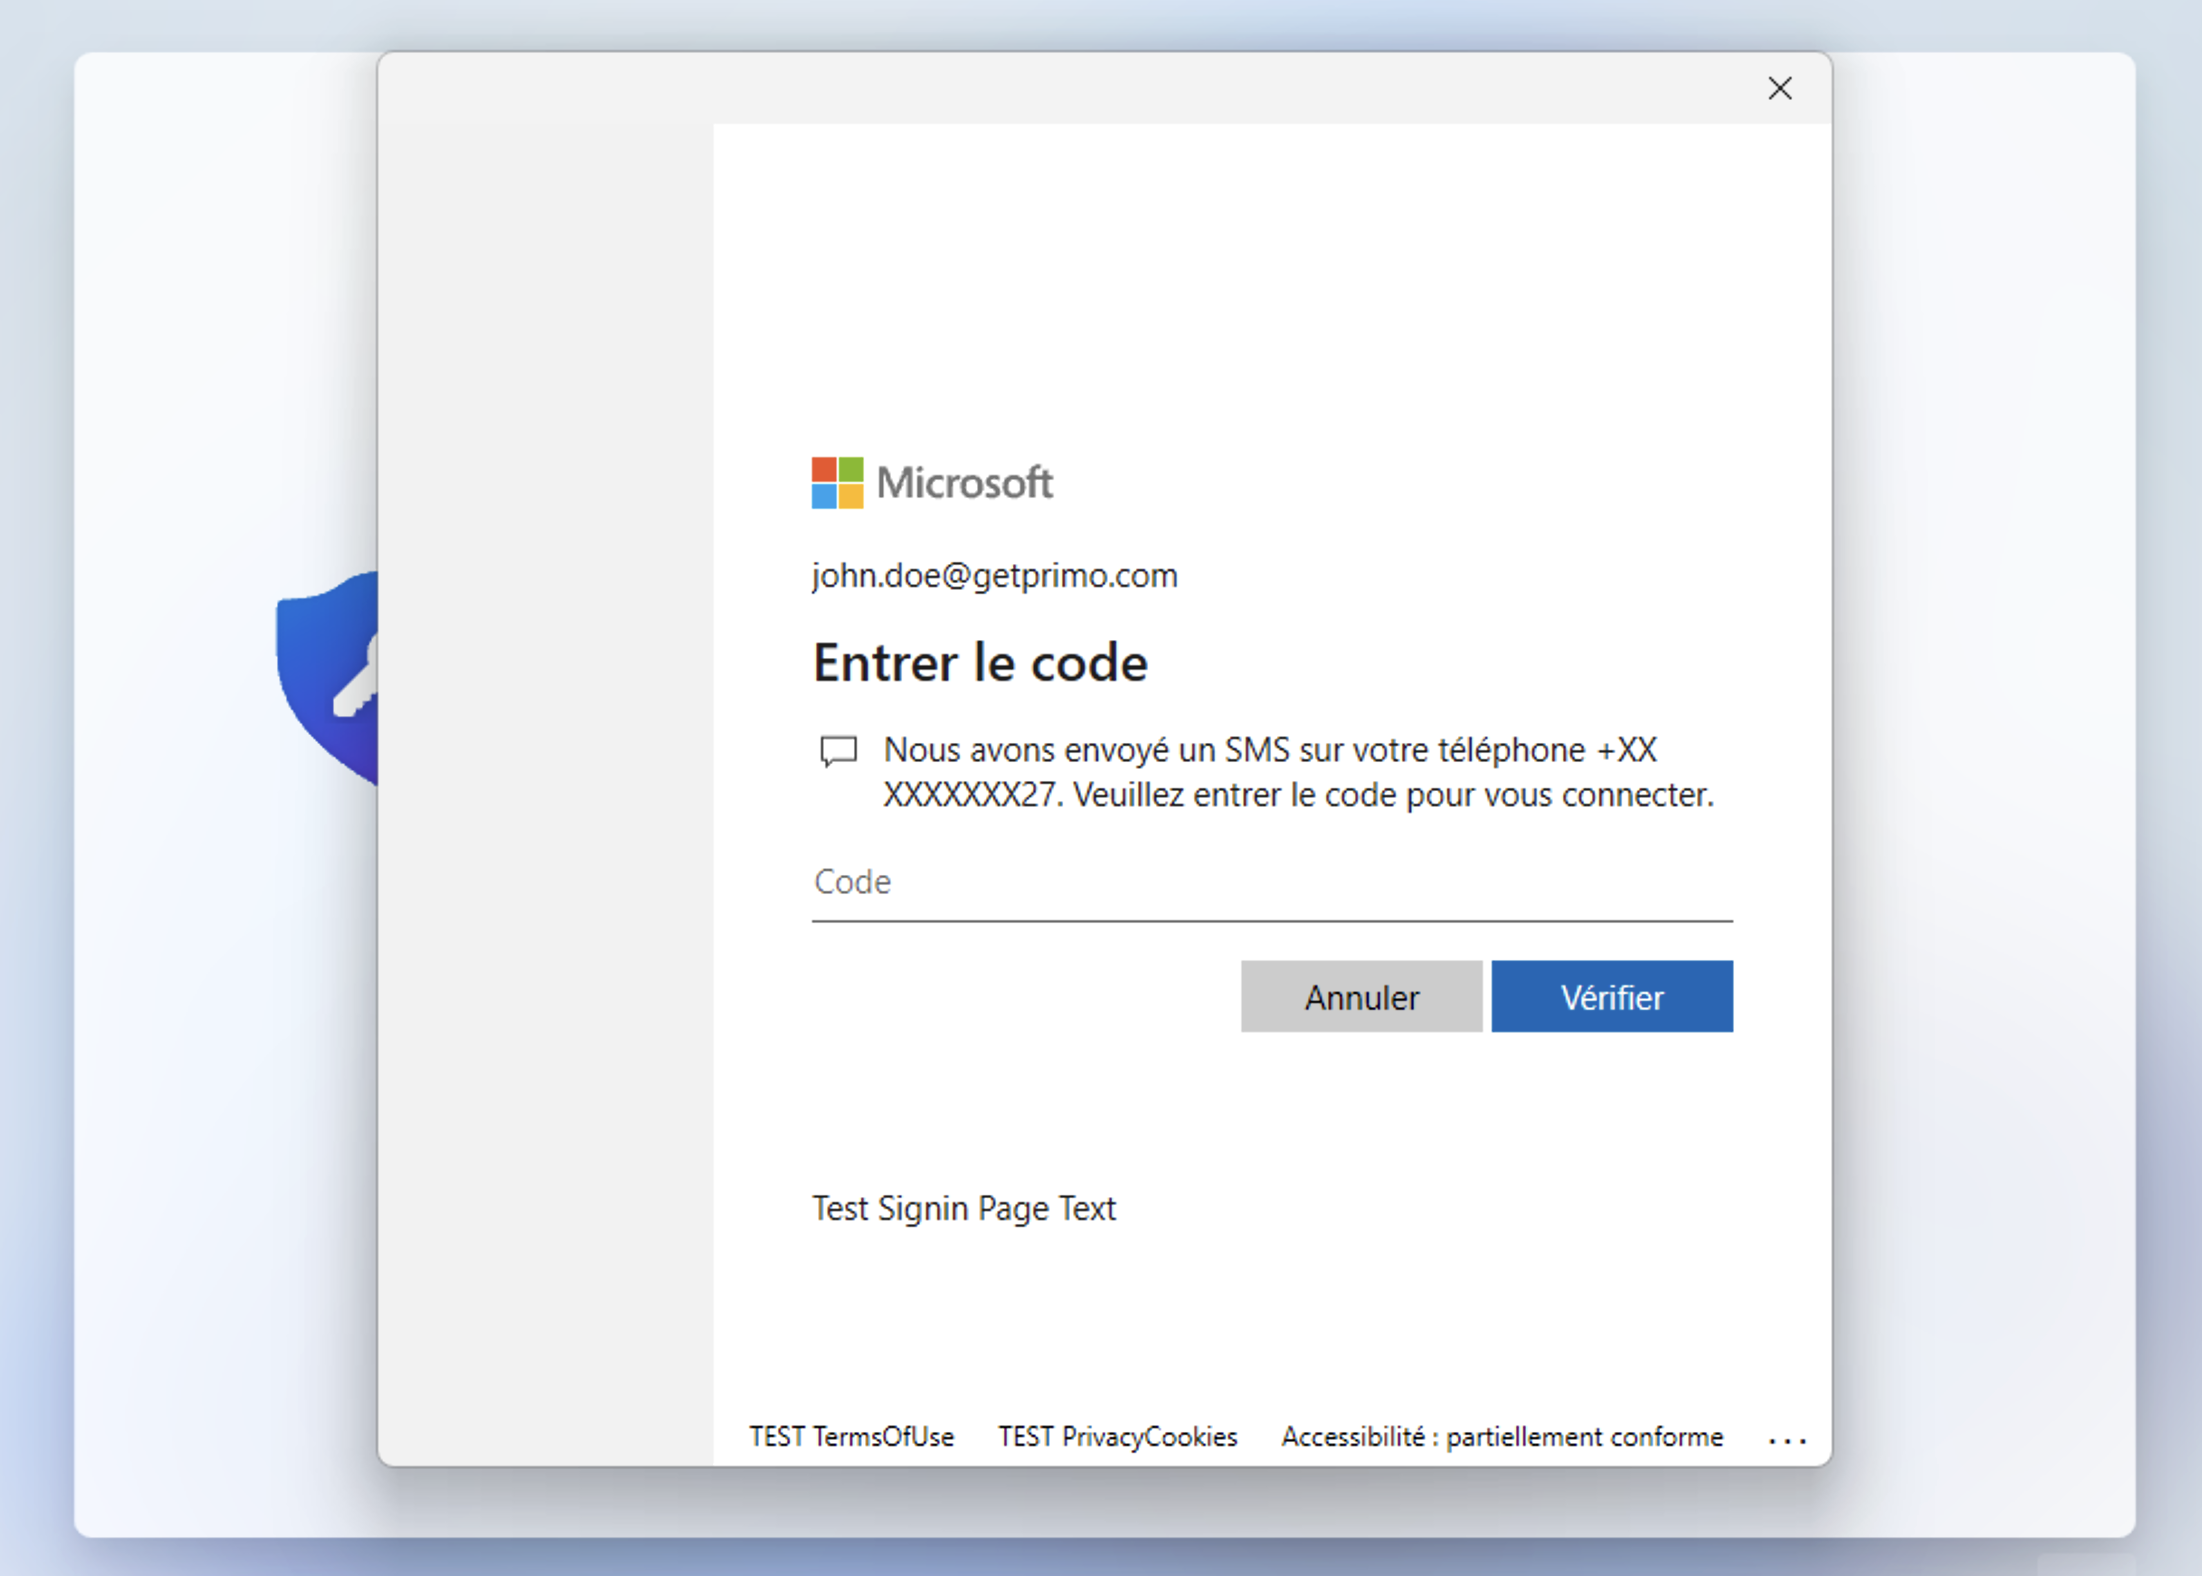
- User signs in with Microsoft credentials + Two-factor authentication if available
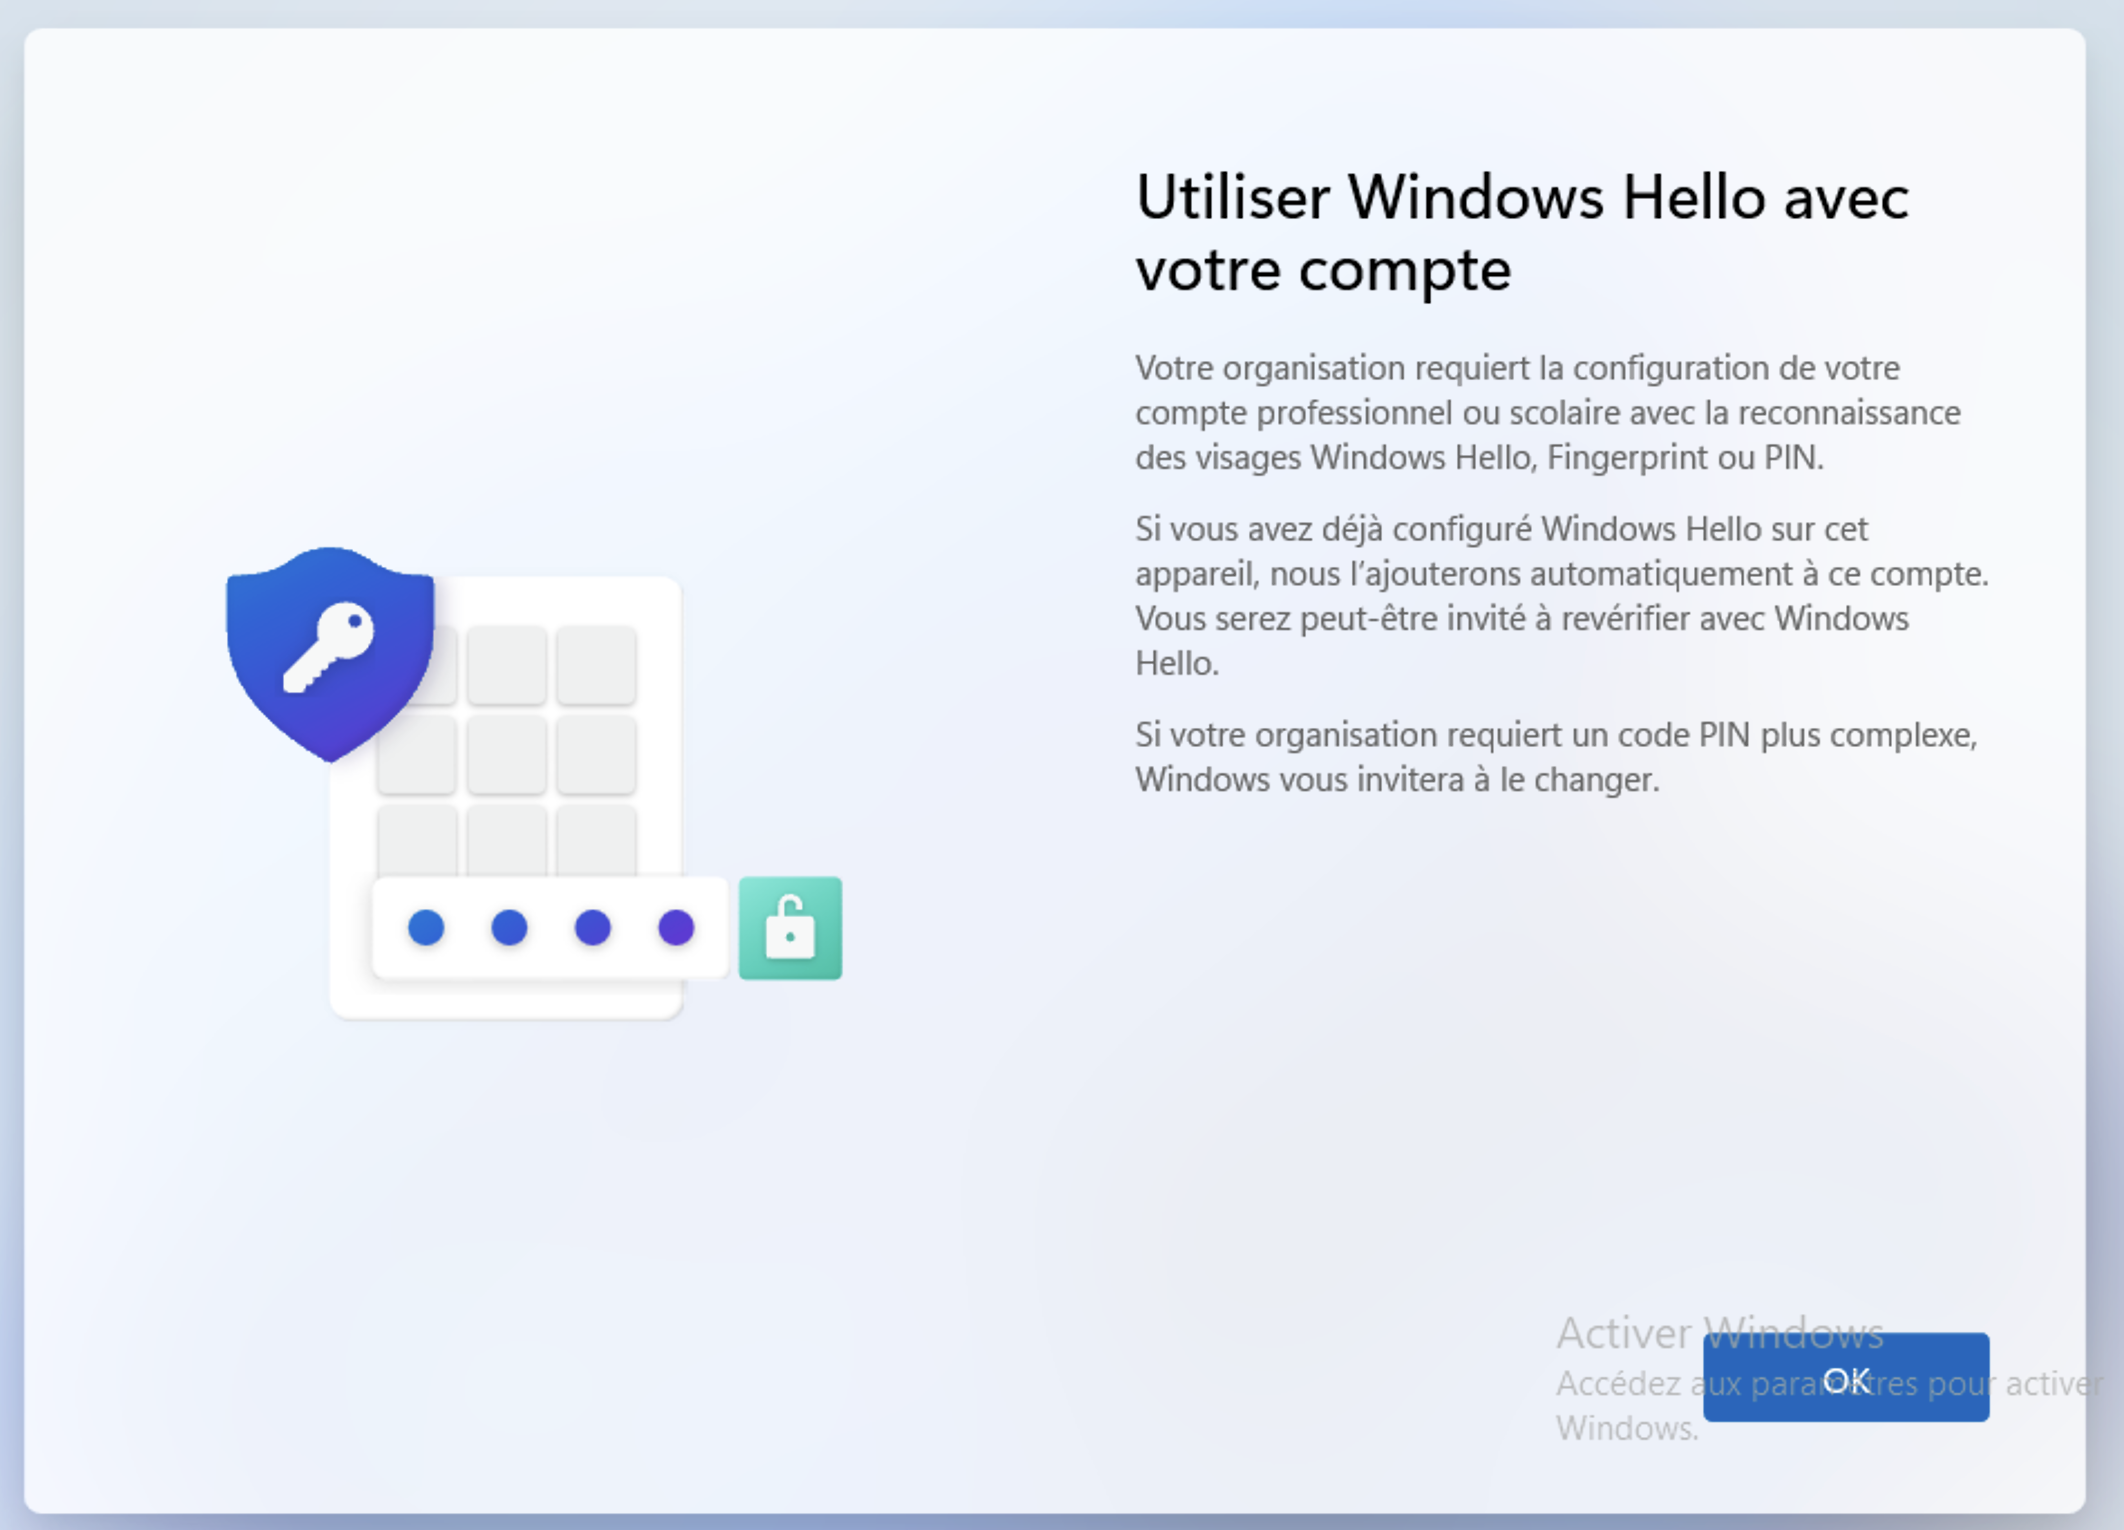
- Set up a PIN code (to avoid entering password each time) and configure fingerprint if supported by the device
- The workstation is ready to use, settings and applications defined in the Factorial IT Cockpit are applied
What are the restrictions?
The main constraint imposed by Autopilot is the type of user account on the machine. The user does not have a "local account" on the machine, but an Entra account.
The differences between these 2 types of accounts are detailed in this article.
Local accounts seem to be increasingly deprecated by Microsoft in favor of Entra accounts.
The Entra administrator can decide if users have a standard user or administrator account (or even create two Autopilot profiles associated with different user groups).
Note that Entra users with the Global Administrator role are automatically administrators of Autopilot machines they log into.
Additionally, Internet access is required during the first boot of the machine to authenticate the user with Entra.
How to set it up?
The necessary steps for setting up an Autopilot pilot are described below.
In the following section, we will assume your company is called ACME and operates on the domain acme.com.
Creating the domain and Fleet application on the Azure portal
This procedure is somewhat more technical and creates a temporal dependency between the client and Factorial IT: when the FleetDM domain is created on the client's Azure portal, a code is generated by Microsoft that must be:
- Communicated to Factorial IT teams
- Added to our infrastructure configuration
- Deployed and propagated (this involves adding a DNS record)
Before the procedure can resume on the Azure portal side (allow approximately 2 business days after communicating the code to us).
If you are currently using Intune as your MDM to manage your IT fleet and intend to switch to try FleetDM (Factorial IT's MDM), you will need to perform a set of operations on the Microsoft Azure console, with administrative rights, to:
- Declare the domain used by FleetDM as legitimate with Azure (e.g.
{company}.mdm.getprimo.com) - Create the Fleet application and give it the necessary and sufficient rights to act as MDM
- Request Azure to have new devices managed by FleetDM instead of Intune
Declaring the FleetDM domain
- Sign in with an administrator account at: https://portal.azure.com/
- Search for and click on Domain names
- Click on + Add custom domain
- In the field, enter {company}.mdm.getprimo.com (i.e. acme.mdm.getprimo.com, ask support (factorial-factorial-support@getprimo.com) if you don't know this domain name)
- Share with us the value of the Destination or routing address field (in the format
MS=ms12345678) - Wait for our response (2 business days at most) before continuing with the procedure
- You can then click on Verify
Creating the FleetDM application
- Sign in with an administrator account at: https://portal.azure.com/
- Search for Mobility (MDM and MAM)
- Choose + Add application, then choose + Create your own application
- Enter Fleet as the application name and click Create
- Fill in
- MDM terms of use URL:
https://{company}.mdm.getprimo.com/api/mdm/microsoft/tos - MDM discovery URL:
https://{company}.mdm.getprimo.com/api/mdm/microsoft/discovery
- MDM terms of use URL:
- Click Save
- Return to Mobility (MDM and MAM)
- Click on the Fleet application then on Custom MDM application settings
- Click on the link below Application ID URI then click Edit
- Enter your Fleet instance address (
https://{company}.mdm.getprimo.com) and click Save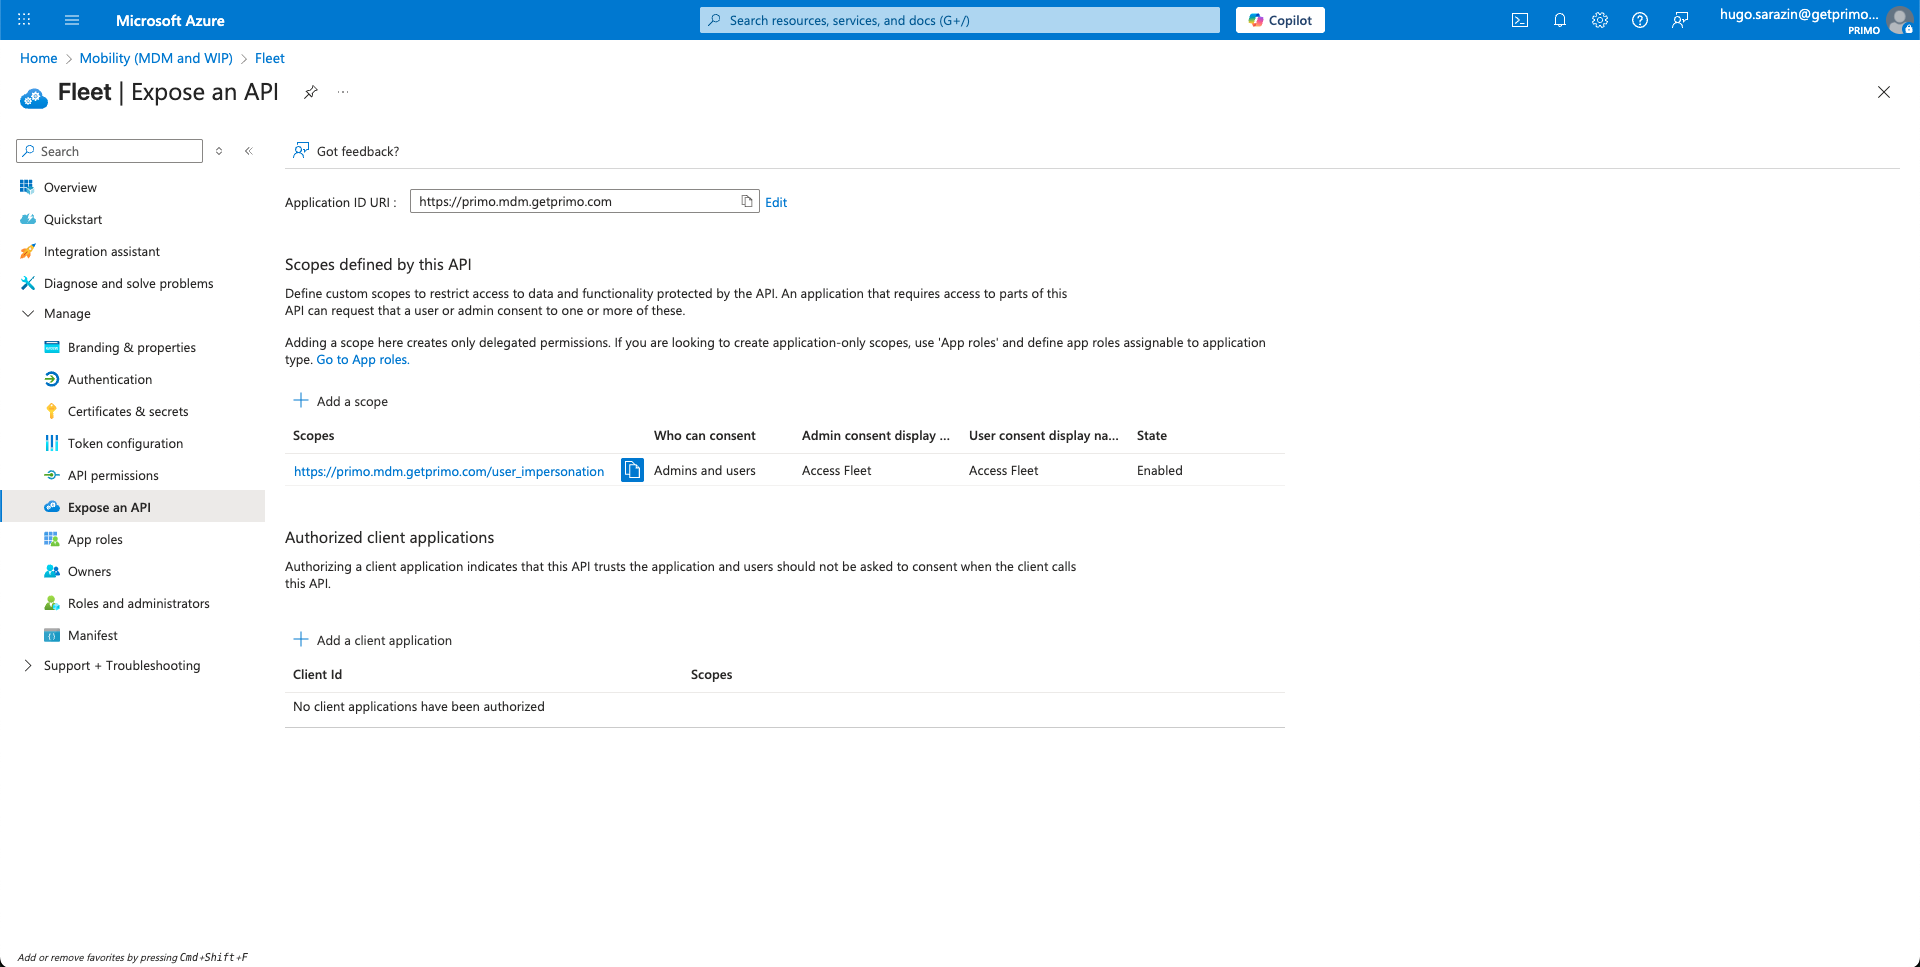
- Choose API permissions then Add a permission
- Click on Microsoft Graph then on Delegated permissions, then select:
- Group > Group.Read.All
- Group > Group.ReadWrite.All
- And click Add permissions
- Then return to API permissions and Add a permission, and choose Microsoft Graph again
- This time, click on Application permissions, and add the following permissions:
- Device > Device.Read.All
- Device > Device.ReadWrite.All
- Directory > Directory.Read.All
- Group > Group.Read.All
- User > User.Read.All
- and click Add permissions
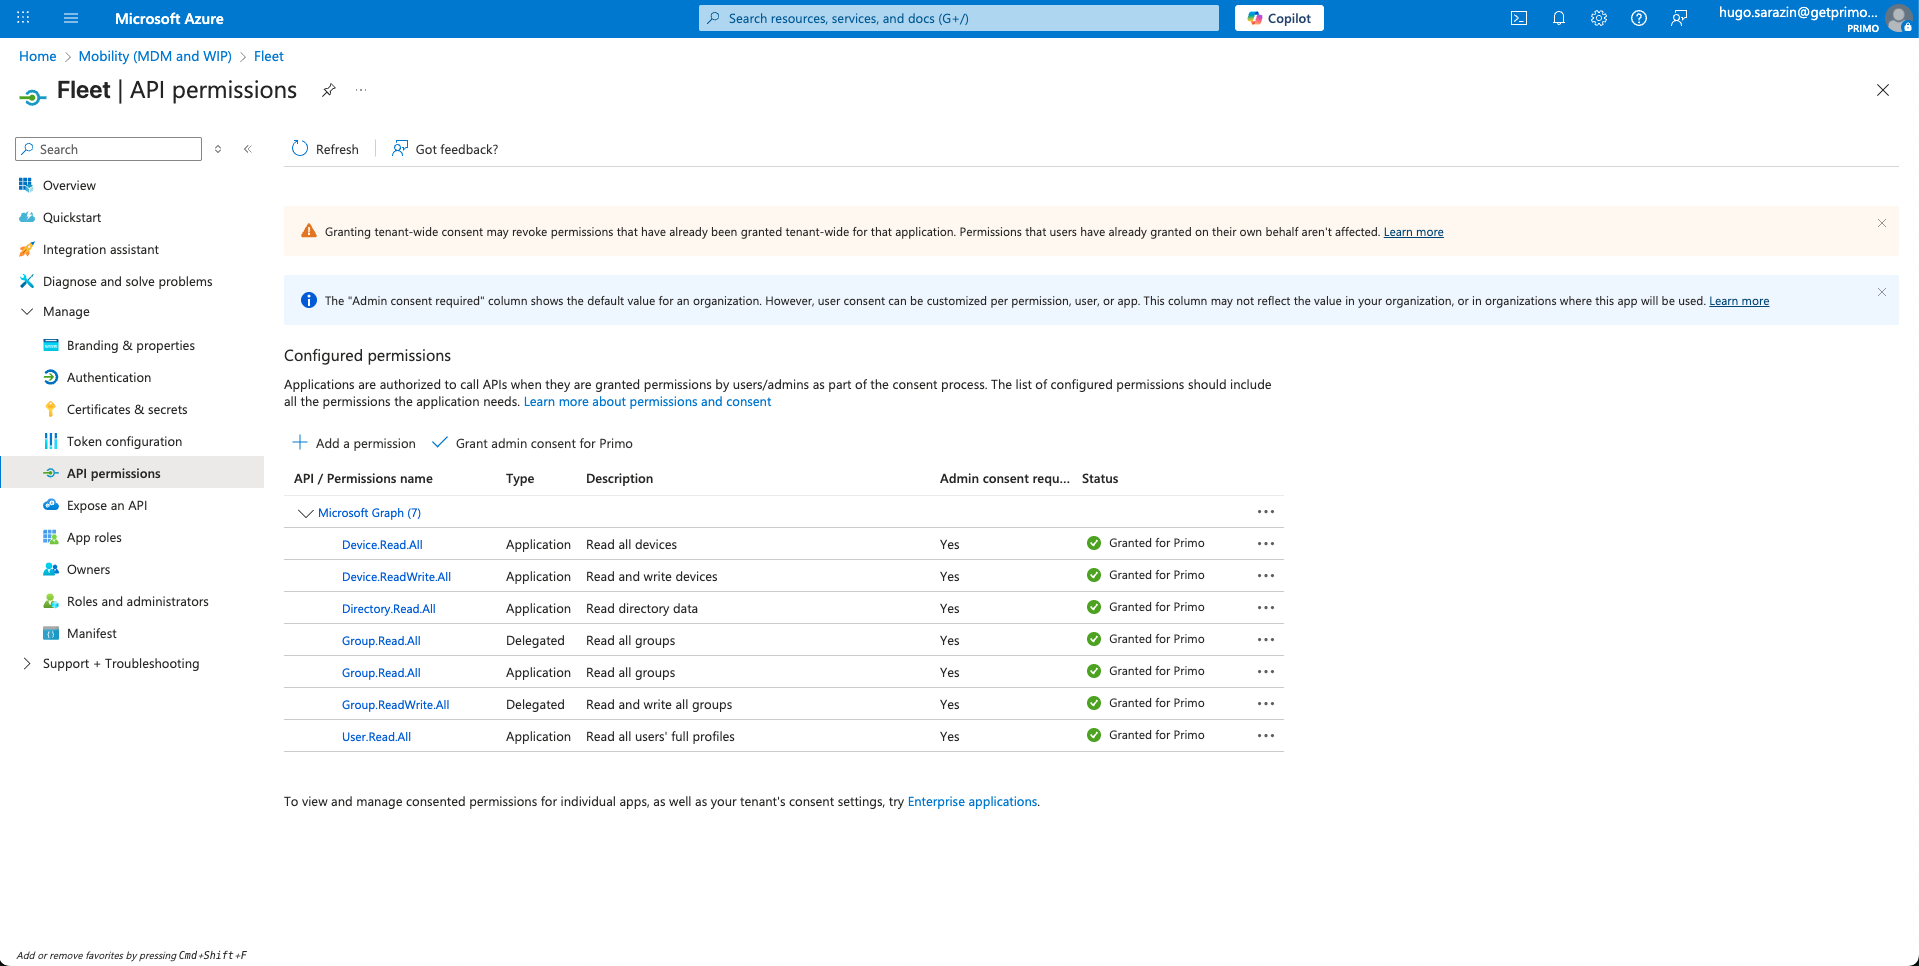
- Once back on the API permissions screen, click on Grant admin consent for ACME
The Fleet application is now declared as a legitimate MDM with the Azure portal.
Declaring FleetDM as the default MDM for new devices
- Sign in with an administrator account at: https://portal.azure.com/
- Go to Mobility (MDM and MAM)
- Click on Microsoft Intune
- In MDM user scope, select None
- In MAM user scope, select None
- Click Save
- Go to Mobility (MDM and MAM)
- Click on Fleet
- In MDM user scope, select All
- In MAM user scope, select All
- Click Save
The Fleet application is now declared as the MDM that will handle new devices with the Azure portal.
Note: If you have started enrolling devices on Factorial IT/FleetDM before performing these operations, please let us know so we can force the MDM change from Intune ⇒ FleetDM by running a script (without which the machine is in an inconsistent state that may affect the Factorial IT experience).
Managing Deployment Profiles on the Intune console
To complete the Autopilot setup, it is necessary to create at least one "deployment profile".
You can find Microsoft's official documentation on Deployment Profiles at this link.
Through this profile, it is possible to define the following settings:
- Choice of user type: Administrator or StandardNote: Entra users with a Global Administrator role will be administrators of all machines regardless of this setting's value
- Default country choice
- Default keyboard language choice
- Machine naming patternFor example:
ACME-%RAND:5%will generate the following names:- ACME-23456
- ACME-98479
- ACME-19838
To create a deployment profile, follow these instructions:
- Go to the following link or sign in to https://intune.microsoft.com/ and go to Devices > Enrollment > Deployment Profiles
- Click + Create profile
- The first step allows you to name the profile
- The second allows you to describe the deployment modes
- The third step allows you to assign profiles to device
Create a dynamic group to target all ZTD devices:
- Go to the following link
- Click + Create group
- Name it “Windows Autopilot devices”, for example
- As target select “dynamic devices”
- For the dynamic rule, use (device.devicePhysicalIds -any (_ -startsWith "[ZTDid]"))
- Click Create
Finally, create an Enrollment Status Page configuration:
- Go to the following link or sign in to https://intune.microsoft.com/ and go to Devices > Enrollment > Enrollment Status Page
- Click + Create
- The first step allows you to name the profile (i.e. Factorial IT)
- The second allows you to define wether you want to show the progress to the user or not. We suggest “yes”. If yes, you can put the settings you want. You can keep the default values
- The third step allows you to assign the ESP to devices. Assign it to your dynamic group.
Testing the Autopilot experience
Sharing Intune admin console access with InMac
For Autopilot to work automatically on devices ordered through Factorial IT, it is necessary to perform an operation with our partner reseller InMac:
- Establish a Microsoft partnership relationship between InMac and you
This access will allow them, for each ordered device, to inform Intune of its existence and ensure that it is handled by Factorial IT during its initialization.
To do this, you must use the following link from an account with the Global Administrator role.
Follow the instructions until accepting the partnership relationship.
Alternative: testing on existing hardware (requires device reset)
There is another way to test the Autopilot experience without necessarily ordering new devices through Factorial IT (and therefore without having to establish the partnership relationship and granular access to the admin console described in the previous paragraph).
To do this, simply follow these instructions from our partner FleetDM (Step 2: register a test workstation) which describes the process that consists of:
- Extracting the device hash (its serial number, so to speak)
- Importing it into the list of Autopilot devices on your Azure/Intune console (this is how the link is made between this device and your company)
- Resetting the device
The user can then enjoy the Autopilot experience.