What is a community post?
A Community post is a message shared within your company's internal Community space. It’s a simple and effective way to share updates, ask questions, or start discussions with your colleagues.
Community Posts are often used by HR, managers, or team leads to:
- Share company news or event announcements
- Promote internal initiatives (like wellness programs or training)
- Ask for feedback or ideas
- Encourage employee interaction and engagement
These posts help create an open and collaborative work environment where everyone stays informed and connected.
How to create a post
To create a post through the Dashboard:
- On your sidebar, click on Dashboard
- Scroll down to All communities or choose a different community
- Click on Create post

At the moment, posts created in Factorial Communities can’t be synchronised with any social media platform.
All publications and interactions stay within Factorial, maintaining a private and secure environment for your team.
How to fill out the information to create a post
- After clicking on Create post, a new page will appear to:
- Add a picture (PNG, JPEG, JPG, GIF, BMP, TIF, SVG), size: 1220x686px (to 12MB for videos)
- Insert a title
- If the post is an event, flag the option and enter the date, time, and location
- Add a description: highlight important concepts and make the post more readable using bold, italic, and underlined words
- Adding External Links to Your Posts. You can also include links to external websites — for example, a YouTube video, a company blog post, or any relevant online resource.
- To do this, simply paste the link directly into your post

Now you can also attach files to the post. Click on 📎 icon and choose your files (Max: 200 MB in total).

- To do this, simply paste the link directly into your post
- Click on Continue located in the upper right-hand corner
- Select the Community
- Flag or not the options
- Click on Publish
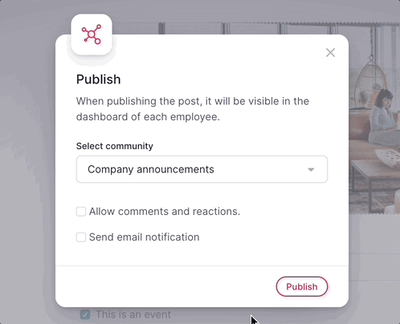
Keep in mind:
When publishing the event it will be visible in the company calendar and the dashboard of each employee. It's also up to you to:
- Send email notification
- Allow comments and reactions
Admins can:
- Delete automatic posts like birthdays
- Be able to see who has viewed the event
-
Admins and the user who has created a post, will see the ellipsis button at the top right by clicking on the (…)
- That button will allow you to: Edit posts, Turn comments and reactions off, and Delete posts.

Employees and other profiles will be able to see how many people have seen the event.