Where to find work schedules
- On your sidebar, head to Settings
- In Time, select Work Schedules

How to create a work schedule
- Click on Add new work schedule
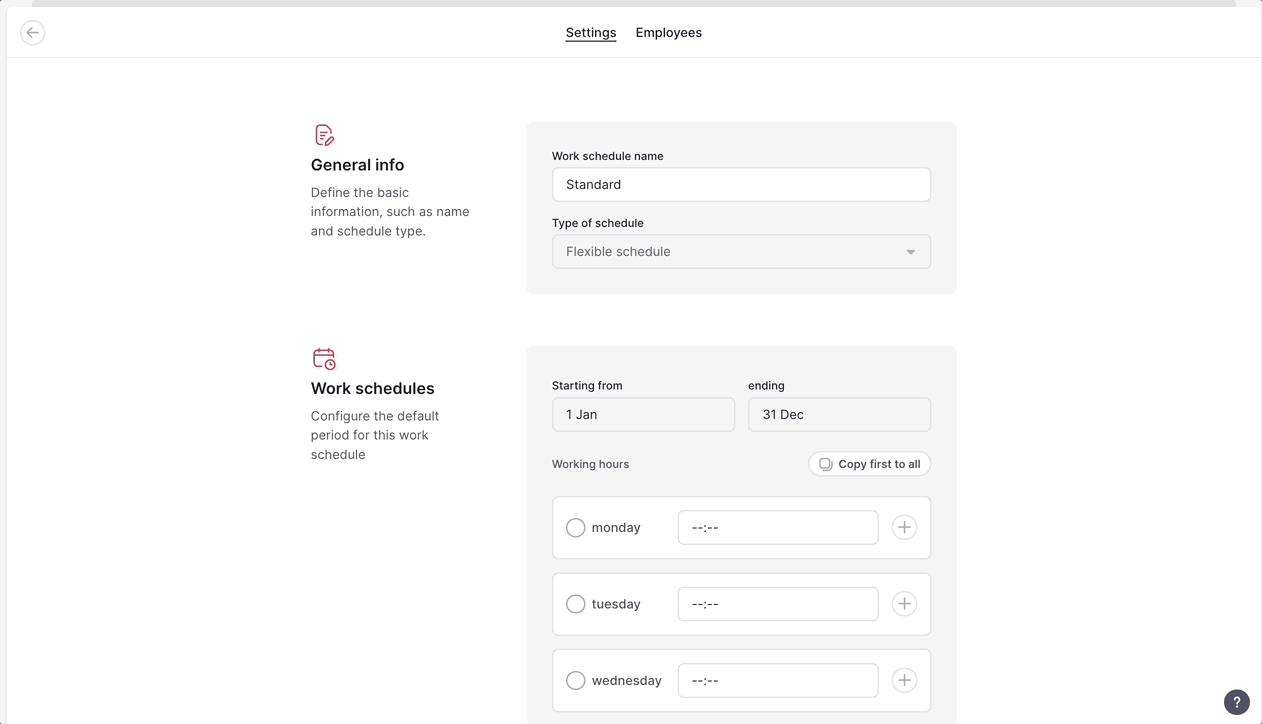
- Define a name
- Choose the type of schedule:
- Flexible schedule: define a number of hours to be worked each day of the week for a given period of time (e.g. 8 hours of work per day).
- Fixed schedule: define the entry and exit time to be worked each day of the week for a given period of time (e.g. 09:00 - 13:00 and from 14:00 - 18:00).
- Click on Add new work schedule
- Enter the hours per day that you want to assign in this new work schedule
- Click on Submit

Important: Once you have selected and confirmed the type of schedule, you cannot change the work schedule type when attributing hours.
Once you have created a work schedule, Factorial creates a period by default that is set from the 1st of January until the 31st of December. In case you want to add a new period to a work schedule, you must define the start and end date of the new period you are adding to the current work schedule. This new period will then overlap with the previous one.
For Example: You set your main period Monday to Friday with 8 hours shifts per day from the 1st of January to the 31st of December.
You now wish to add a new period from Monday to Friday with 6 hours shifts per day from the 15th of July to the 15th of August
- From 1st of January until 14th of July from Monday to Friday 8h/day
- From 15th of July until 15th of August from Monday to Friday 6h/day
- From 16th of August until 31st of December from Monday to Friday 8h/day
Flexible Schedule
- From the Settings tab, configure the number of hours to be worked each day of the week.
If the number of hours is the same for each day, you can simply enter the amount on the first day of the week and then click Copy first to all.
Fixed Schedule
- From the Settings tab, configure the entry and exit time for each day of the week.
If the schedule is the same for each day, you can simply complete the first day of the week and then click Copy first to all.

How to assign employees to work schedules
- Go to the Employees tab
- Click on + Add
- Select the employees
- Click on Assign employees
- Select an effective date: the date on which this new schedule takes effect. You can set effective dates in the past, but if you do this, you may cause changes in the employee's time tracking count.

Take advantage of our time planning tool, which allows you to assign your employees to specific work schedules or seamlessly transfer them to another scheduling tool.
How to define periods when the work schedule differs from the default
- Choose the work schedule you want to edit
- Click on (...)
- Select Edit
- Scroll down to Periods
- Click on Add new period
- Configure the period and click on Add period

How to delete work schedules or periods
Work schedules cannot be deleted once they have been assigned to employees. Instead, you can archive the work schedule, but first, you must reassign these employees to another work schedule and confirm an effective date.
To Archive a work schedule:
- Click on (..)
- Select Archive
- Re-assign employees
- Choose the Effective date
- Click on Archive work schedule

To delete periods, simply click on the gear icon and delete it
Work schedules notifications
An email will be sent when:
- An employee has been assigned to a work schedule.
- Changes or edits are made to an employee's work schedule.
- A new period is about to start - 3 days before.
- (Exclusively for admins) An employee in your team starts a new period.